Screen recording on an iPhone is a handy feature for capturing what’s happening on your screen, whether it’s for a tutorial, a gaming session, or just to save a memorable chat. Here’s a quick overview: Go to Settings, Control Center, then Customize Controls. Add the Screen Recording feature, swipe up to access the Control Center, and tap the record button. A countdown begins, and your screen recording starts. To stop, tap the red status bar at the top of your screen and confirm. Simple, right?
You can also check out this video about how to screen record on iPhone for additional information.
Step by Step Tutorial on How to Screen Record on iPhone
Before you can start recording your iPhone screen, you need to make sure the screen recording feature is accessible from the Control Center. Here’s how you can do it.
Step 1: Go to Settings
Open the Settings app on your iPhone.
In this step, you’re looking for the Control Center options. The Control Center is that handy menu that pops up when you swipe up from the bottom of your screen (or down from the top-right corner on an iPhone X or later).
Step 2: Select Control Center
Scroll down and tap on ‘Control Center’.
The Control Center settings let you choose which features you want to be able to access quickly. This is where you can add the screen recording function if it’s not already there.
Step 3: Choose Customize Controls
Tap ‘Customize Controls’.
You’ll see a list of functions that you can add or remove from your Control Center. This customizability ensures that you have what you need at your fingertips.
Step 4: Add Screen Recording
Find ‘Screen Recording’ and tap the green plus icon next to it.
This adds the screen recording button to your Control Center. If you ever want to remove it, you can come back here and tap the red minus button.
Step 5: Swipe up to access the Control Center
Now, swipe up from the bottom edge of any screen (or down from the top-right corner on an iPhone X or later).
You should see a new icon that looks like a solid circle inside a thin ring. That’s your screen recording button.
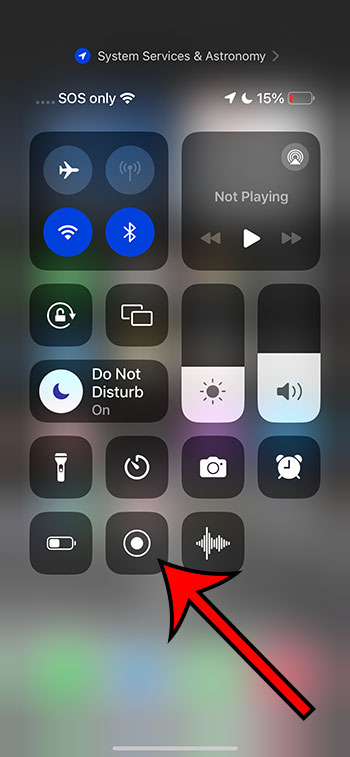
Step 6: Tap the record button
Tap the screen recording button to start recording your screen.
When you tap the button, you’ll see a brief countdown before the recording starts. This gives you a moment to get to the screen you want to record.
Once the recording begins, you’ll see a red status bar or a red clock at the top of your screen. This means your screen is being recorded.
Step 7: Stop the recording
To stop recording, tap the red status bar at the top of your screen, then tap ‘Stop’.
Your screen recording will be saved to your Photos app. From there, you can edit it, share it, or keep it for future reference.
After completing these steps, your screen recording will be saved automatically to your Photos album. From there, you can view it, edit it, share it with friends, or upload it wherever you like. It’s like having a digital copy of whatever was on your iPhone screen.
Tips for Screen Recording on iPhone
- Before you start recording, make sure your iPhone is charged or plugged in, as screen recording can consume a lot of battery.
- Turn on ‘Do Not Disturb’ mode to avoid interruptions like calls or notifications during a screen recording.
- If you want to record audio with your screen recording, press and hold the screen recording button and then turn on the microphone.
- Screen recordings can take up a lot of storage space, so regularly check and delete any recordings you don’t need.
- Be mindful of private information on your screen when recording, as it will be captured in the video.
Frequently Asked Questions
How do I record sound with my screen recording?
Press and hold the screen recording icon in the Control Center, then tap the Microphone icon to turn it on.
This allows you to capture not just the sound from your iPhone, but also external sounds, like your voice.
Can I edit my screen recording?
Yes, the video can be edited directly in the Photos app after saving it.
Trim the beginning and end of your videos, add filters, or even crop the frame to focus on a specific area.
Is there a time limit on how long I can record my screen?
There is no set time limit for screen recording on the iPhone, but the length can be limited by your device’s storage space.
Keep an eye on available storage so that your recording doesn’t get cut off unexpectedly.
Where are my screen recordings saved?
All screen recordings are saved automatically in the Photos app under ‘Videos’.
From the Photos app, you can view, edit, or share your screen recordings as you would with any other video.
Can I record a FaceTime call with screen recording?
Yes, you can record a FaceTime call with screen recording, but make sure to inform the other parties for privacy reasons.
Recording personal interactions without consent could be illegal or considered a breach of privacy, so always be transparent.
Summary
- Go to Settings.
- Select Control Center.
- Choose Customize Controls.
- Add Screen Recording.
- Swipe up to access the Control Center.
- Tap the record button.
- Stop the recording by tapping the red status bar.
Conclusion
So, there you have it! Screen recording on an iPhone is a breeze once you know the steps. Whether you’re a tech whiz or new to the iPhone world, these tips and tricks will have you capturing your screen like a pro in no time. Remember, adding the screen recording feature to your Control Center is just the start. With a little bit of practice, you’ll be recording, editing, and sharing your screen recordings effortlessly.
Always make sure to have enough storage space, as videos can quickly fill up your iPhone’s memory. And don’t forget, while screen recording can be incredibly useful, it’s important to respect privacy and obtain consent when recording content that involves others. So go ahead, give it a try, and start recording those precious moments, important tutorials, or hilarious gameplay. Screen recording on iPhone is just another fantastic feature that makes our digital lives more exciting and shareable. Happy recording!